The post AI Produces Data-driven OpenFOAM Speedup (HPC Wire) appeared first on Linux.com.
]]>The post AI Produces Data-driven OpenFOAM Speedup (HPC Wire) appeared first on Linux.com.
]]>The post PyTorch 2.0: Our next generation release that is faster, more Pythonic and Dynamic as ever appeared first on Linux.com.
]]>This next-generation release includes a Stable version of Accelerated Transformers (formerly called Better Transformers); Beta includes torch.compile as the main API for PyTorch 2.0, the scaled_dot_product_attention function as part of torch.nn.functional, the MPS backend, functorch APIs in the torch.func module; and other Beta/Prototype improvements across various inferences, performance and training optimization features on GPUs and CPUs. For a comprehensive introduction and technical overview of torch.compile, please visit the 2.0 Get Started page.
Along with 2.0, we are also releasing a series of beta updates to the PyTorch domain libraries, including those that are in-tree, and separate libraries including TorchAudio, TorchVision, and TorchText. An update for TorchX is also being released as it moves to community supported mode. More details can be found in this library blog.
This release is composed of over 4,541 commits and 428 contributors since 1.13.1. We want to sincerely thank our dedicated community for your contributions. As always, we encourage you to try these out and report any issues as we improve 2.0 and the overall 2-series this year.
Summary:
- torch.compile is the main API for PyTorch 2.0, which wraps your model and returns a compiled model. It is a fully additive (and optional) feature and hence 2.0 is 100% backward compatible by definition.
- As an underpinning technology of torch.compile, TorchInductor with Nvidia and AMD GPUs will rely on OpenAI Triton deep learning compiler to generate performant code and hide low level hardware details. OpenAI Triton-generated kernels achieve performance that’s on par with hand-written kernels and specialized cuda libraries such as cublas.
- Accelerated Transformers introduce high-performance support for training and inference using a custom kernel architecture for scaled dot product attention (SPDA). The API is integrated with torch.compile() and model developers may also use the scaled dot product attention kernels directly by calling the new scaled_dot_product_attention() operator.
- Metal Performance Shaders (MPS) backend provides GPU accelerated PyTorch training on Mac platforms with added support for Top 60 most used ops, bringing coverage to over 300 operators.
- Amazon AWS optimizes the PyTorch CPU inference on AWS Graviton3 based C7g instances. PyTorch 2.0 improves inference performance on Graviton compared to the previous releases, including improvements for Resnet50 and Bert.
- New prototype features and technologies across TensorParallel, DTensor, 2D parallel, TorchDynamo, AOTAutograd, PrimTorch and TorchInductor.
*To see a full list of public 2.0, 1.13 and 1.12 feature submissions click here.
STABLE FEATURES
[Stable] Accelerated PyTorch 2 Transformers
The PyTorch 2.0 release includes a new high-performance implementation of the PyTorch Transformer API. In releasing Accelerated PT2 Transformers, our goal is to make training and deployment of state-of-the-art Transformer models affordable across the industry. This release introduces high-performance support for training and inference using a custom kernel architecture for scaled dot product attention (SPDA), extending the inference “fastpath” architecture, previously known as “Better Transformer.”
Similar to the “fastpath” architecture, custom kernels are fully integrated into the PyTorch Transformer API – thus, using the native Transformer and MultiHeadAttention API will enable users to:
- transparently see significant speed improvements;
- support many more use cases including models using Cross-Attention, Transformer Decoders, and for training models; and
- continue to use fastpath inference for fixed and variable sequence length Transformer Encoder and Self Attention use cases.
To take full advantage of different hardware models and Transformer use cases, multiple SDPA custom kernels are supported (see below), with custom kernel selection logic that will pick the highest-performance kernel for a given model and hardware type. In addition to the existing Transformer API, model developers may also use the scaled dot product attention kernels directly by calling the new scaled_dot_product_attention() operator. Accelerated PyTorch 2 Transformers are integrated with torch.compile() . To use your model while benefiting from the additional acceleration of PT2-compilation (for inference or training), pre-process the model with model = torch.compile(model).
We have achieved major speedups for training transformer models and in particular large language models with Accelerated PyTorch 2 Transformers using a combination of custom kernels and torch.compile().
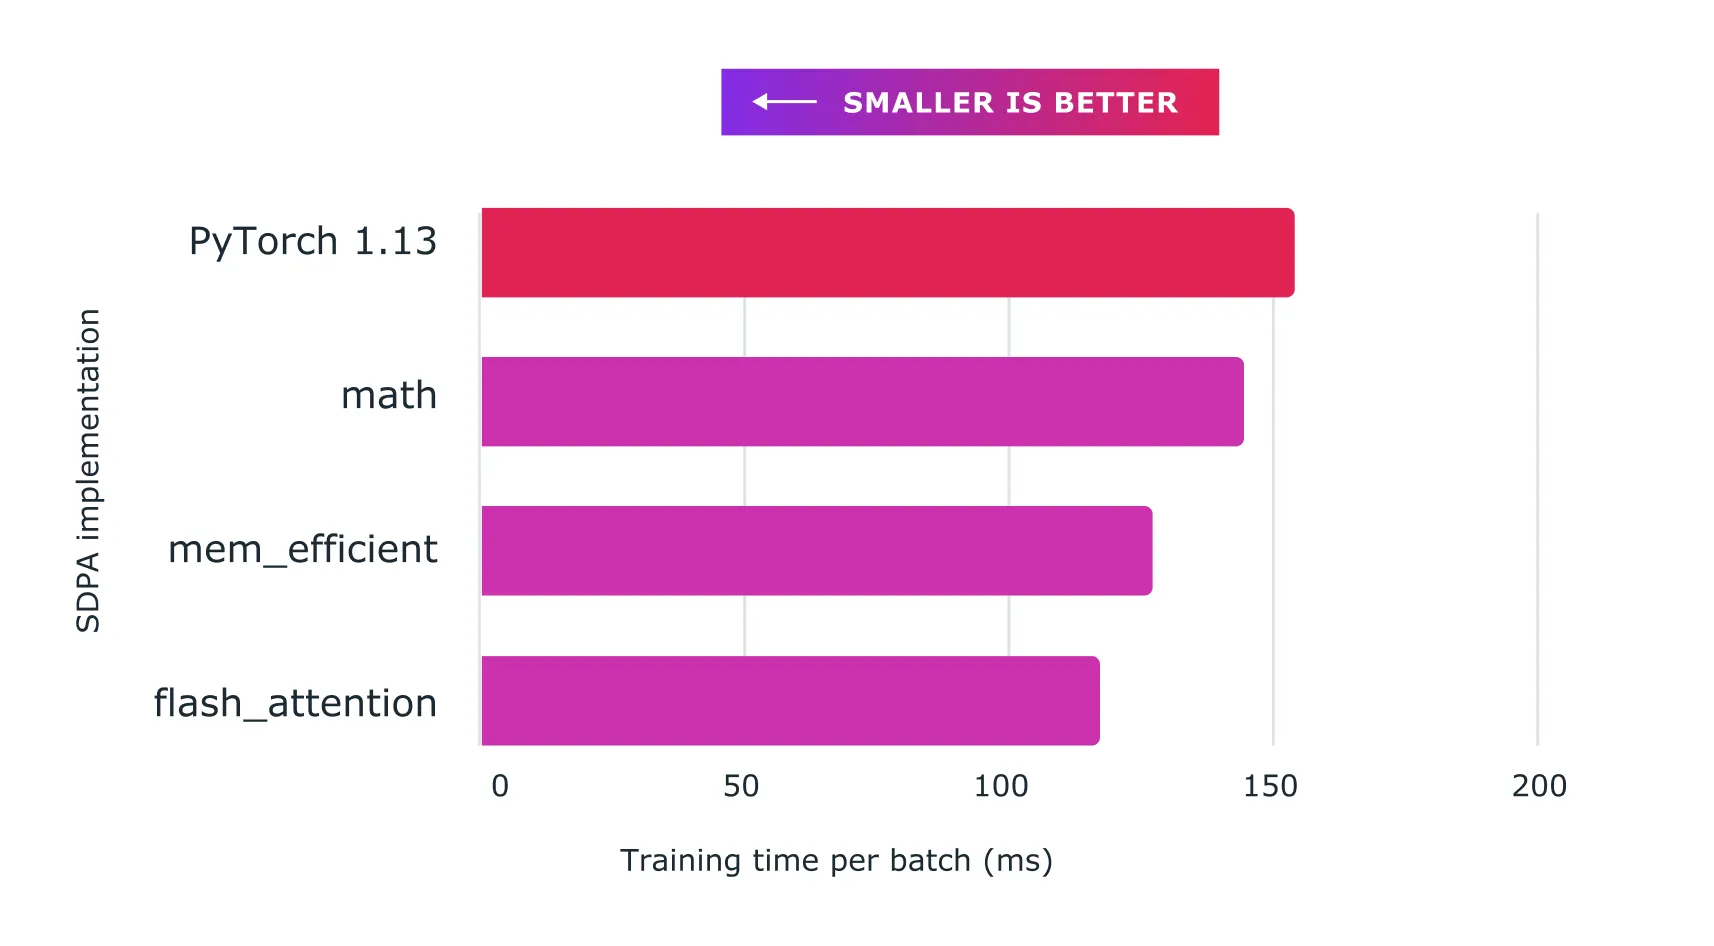 Figure: Using scaled dot product attention with custom kernels and torch.compile delivers significant speedups for training large language models, such as for nanoGPT shown here.
BETA FEATURES
[Beta] torch.compile
torch.compile is the main API for PyTorch 2.0, which wraps your model and returns a compiled model. It is a fully additive (and optional) feature and hence 2.0 is 100% backward compatible by definition.
Underpinning torch.compile are new technologies – TorchDynamo, AOTAutograd, PrimTorch and TorchInductor:
- TorchDynamo captures PyTorch programs safely using Python Frame Evaluation Hooks and is a significant innovation that was a result of 5 years of our R&D into safe graph capture.
- AOTAutograd overloads PyTorch’s autograd engine as a tracing autodiff for generating ahead-of-time backward traces.
- PrimTorch canonicalizes ~2000+ PyTorch operators down to a closed set of ~250 primitive operators that developers can target to build a complete PyTorch backend. This substantially lowers the barrier of writing a PyTorch feature or backend.
- TorchInductor is a deep learning compiler that generates fast code for multiple accelerators and backends. For NVIDIA and AMD GPUs, it uses OpenAI Triton as a key building block. For intel CPUs, we generate C++ code using multithreading, vectorized instructions and offloading appropriate operations to mkldnn when possible.
With all the new technologies, torch.compile is able to work 93% of time across 165 open-source models and runs 20% faster on average at float32 precision and 36% faster on average at AMP precision.
For more information, please refer to https://pytorch.org/get-started/pytorch-2.0/ and for TorchInductor CPU with Intel here.
[Beta] PyTorch MPS Backend
MPS backend provides GPU-accelerated PyTorch training on Mac platforms. This release brings improved correctness, stability, and operator coverage.
MPS backend now includes support for the Top 60 most used ops, along with the most frequently requested operations by the community, bringing coverage to over 300 operators. The major focus of the release was to enable full OpInfo-based forward and gradient mode testing to address silent correctness issues. These changes have resulted in wider adoption of MPS backend by 3rd party networks such as Stable Diffusion, YoloV5, WhisperAI, along with increased coverage for Torchbench networks and Basic tutorials. We encourage developers to update to the latest macOS release to see the best performance and stability on the MPS backend.
Links
- MPS Backend
- Developer information
- Accelerated PyTorch training on Mac
- Metal, Metal Performance Shaders & Metal Performance Shaders Graph
[Beta] Scaled dot product attention 2.0
We are thrilled to announce the release of PyTorch 2.0, which introduces a powerful scaled dot product attention function as part of torch.nn.functional. This function includes multiple implementations that can be seamlessly applied depending on the input and hardware in use.
In previous versions of PyTorch, you had to rely on third-party implementations and install separate packages to take advantage of memory-optimized algorithms like FlashAttention. With PyTorch 2.0, all these implementations are readily available by default.
These implementations include FlashAttention from HazyResearch, Memory-Efficient Attention from the xFormers project, and a native C++ implementation that is ideal for non-CUDA devices or when high-precision is required.
PyTorch 2.0 will automatically select the optimal implementation for your use case, but you can also toggle them individually for finer-grained control. Additionally, the scaled dot product attention function can be used to build common transformer architecture components.
Learn more with the documentation and this tutorial.
[Beta] functorch -> torch.func
Inspired by Google JAX, functorch is a library that offers composable vmap (vectorization) and autodiff transforms. It enables advanced autodiff use cases that would otherwise be tricky to express in PyTorch. Examples include:
- model ensembling
- efficiently computing jacobians and hessians
- computing per-sample-gradients (or other per-sample quantities)
We’re excited to announce that, as the final step of upstreaming and integrating functorch into PyTorch, the functorch APIs are now available in the torch.func module. Our function transform APIs are identical to before, but we have changed how the interaction with NN modules work. Please see the docs and the migration guide for more details.
Furthermore, we have added support for torch.autograd.Function: one is now able to apply function transformations (e.g. vmap, grad, jvp) over torch.autograd.Function.
[Beta] Dispatchable Collectives
Dispatchable collectives is an improvement to the existing init_process_group() API which changes backend to an optional argument. For users, the main advantage of this feature is that it will allow them to write code that can run on both GPU and CPU machines without having to change the backend specification. The dispatchability feature will also make it easier for users to support both GPU and CPU collectives, as they will no longer need to specify the backend manually (e.g. “NCCL” or “GLOO”). Existing backend specifications by users will be honored and will not require change.
Usage example:
import torch.distributed.dist
…
# old
dist.init_process_group(backend=”nccl”, ...)
dist.all_reduce(...) # with CUDA tensors works
dist.all_reduce(...) # with CPU tensors does not work

# new
dist.init_process_group(...) # backend is optional
dist.all_reduce(...) # with CUDA tensors works
dist.all_reduce(...) # with CPU tensors works
Learn more here.
[Beta] torch.set_default_device and torch.device as context manager
torch.set_default_device allows users to change the default device that factory functions in PyTorch allocate on. For example, if you torch.set_default_device(‘cuda’), a call to torch.empty(2) will allocate on CUDA (rather than on CPU). You can also use torch.device as a context manager to change the default device on a local basis. This resolves a long standing feature request from PyTorch’s initial release for a way to do this.
Learn more here.
The post PyTorch 2.0: Our next generation release that is faster, more Pythonic and Dynamic as ever appeared first on Linux.com.
]]>The post Download the 2021 Linux Foundation Annual Report appeared first on Linux.com.
]]>
In 2021, The Linux Foundation continued to see organizations embrace open collaboration and open source principles, accelerating new innovations, approaches, and best practices. As a community, we made significant progress in the areas of cloud-native computing, 5G networking, software supply chain security, 3D gaming, and a host of new industry and social initiatives.
Download and read the report today.
The post Download the 2021 Linux Foundation Annual Report appeared first on Linux.com.
]]>The post Consolidation of AI, ML and Date Projects at The Linux Foundation appeared first on Linux.com.
]]>The Linux Foundation consolidated its projects around AI, ML & Data by bringing them under the umbrella of the LF AI & Data Foundation. Swapnil Bhartiya, founder and host at TFiR.io, sat down with Ibrahim Haddad, Executive Director of LF AI & Data to discuss this consolidation.
Transcript of the discussion:
Swapnil Bhartiya: A lot of consolidation is happening within the Linux Foundation around AI/ML projects. Can you talk about what AI/ML & data projects are there under the Linux Foundation umbrella right now?
Ibrahim Haddad: So, if you think of Linux Foundation, it is kind of a foundation of foundations. There are multiple umbrella foundations. There’s the CNCF (Cloud Native Computing Foundation), there’s LF Edge, there’s the Hyperledger project, automotive, et cetera. And LF AI & Data is one of these umbrella foundations. We share the same goal, which is to accelerate the development of open-source projects and innovation. However, we each do it in our specific domains.
We’re focused on AI, machine learning, deep learning, and the data aspects of AI. The LF AI & Data Foundation was initially kicked off as LF Deep Learning in March of 2018. We grew a bit, and we started to host projects in other subdomains within the AI umbrella. And then we rebranded again to LF AI & Data to reflect the additional growth in our portfolio.
As of today, we host 22 projects across multiple domains of machine learning, deep learning, data models, and trusted AI. We have, I believe, 36 numbered companies that are involved in our foundation.
Swapnil Bhartiya: Within the Linux Foundation, there are a lot of projects that at times overlap, and then there are gaps as well. So, within the AI/ML space, where do you still see gaps that need to be bridged and overlaps that need consolidation?
Ibrahim Haddad: When a project is contributed to the foundation, we see under which umbrella it fits, however it’s the decision of the project where they want to go, we only offer guidance. If projects do overlap under the same umbrella, it’s their call to make. In terms of consolidation, we’re actually in the process of doing this at least in the AI space. We recently announced the formation of LF AI & Data, which consolidates two projects – LF AI Foundation and ODPi.
Swapnil Bhartiya: Can you also talk about what are the new goals or new areas that the Foundation is focusing on after this consolidation and merger?
Ibrahim Haddad: The first one is increasing the collaboration between the projects that are on the data side and the traditional open-source AI projects that we host. We host about seven projects that focus on the data and 15 projects in the general AI domain. One of the activities we launched, which we are going to accelerate in 2021, is creating integration across different projects so that companies see a tighter integration within projects inside the foundation.
The second area is trusted AI to build trust and a responsible AI system, which is really a hot topic across industry verticals including governments, NGOs and companies. They all are putting emphasis on building fair systems, systems that don’t create bias, systems that are transparent, systems that are robust. Building trust with the consumer of these systems is a very critical thing. So trusted and responsible AI would be a key area in addition to the integration and growing the data/AI collaborations.
The post Consolidation of AI, ML and Date Projects at The Linux Foundation appeared first on Linux.com.
]]>The post Amundsen: one year later (Lyft Engineering) appeared first on Linux.com.
]]>In almost every modern data-driven company, each interaction with the platform is powered by data. As data resources are constantly growing, it becomes increasingly difficult to understand what data resources exist, how to access them, and what information is available in those sources without tribal knowledge. Poor understanding of data leads to bad data quality, low productivity, duplication of work, and most importantly, a lack of trust in the data. The complexity of managing a fragmented data landscape is not just a problem unique to Lyft, but a common one that exists throughout the industry.
In a nutshell, Amundsen is a data discovery and metadata platform for improving the productivity of data analysts, data scientists, and engineers when interacting with data. By indexing the data resources (tables, dashboards, users, etc.) and powering a page-rank style search based on usage patterns (e.g. highly-queried tables show up earlier than less-queried tables), these customers are able to address their data needs faster.
The post Amundsen: one year later (Lyft Engineering) appeared first on Linux.com.
]]>The post Developing an email alert system using a surveillance camera with Node-RED and TensorFlow.js appeared first on Linux.com.
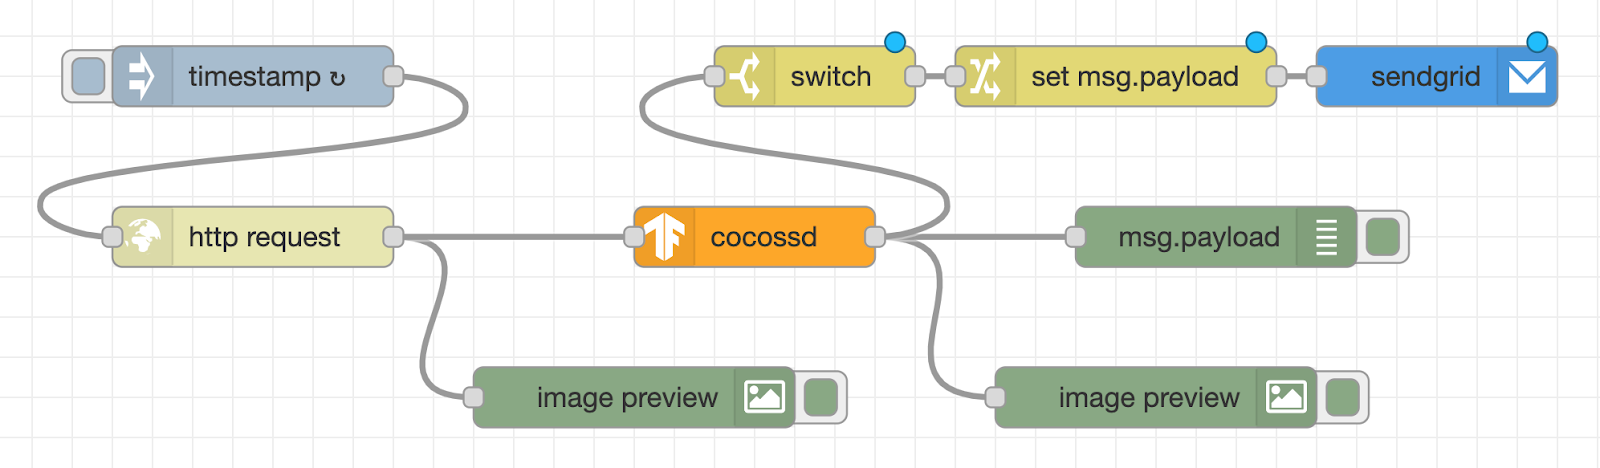
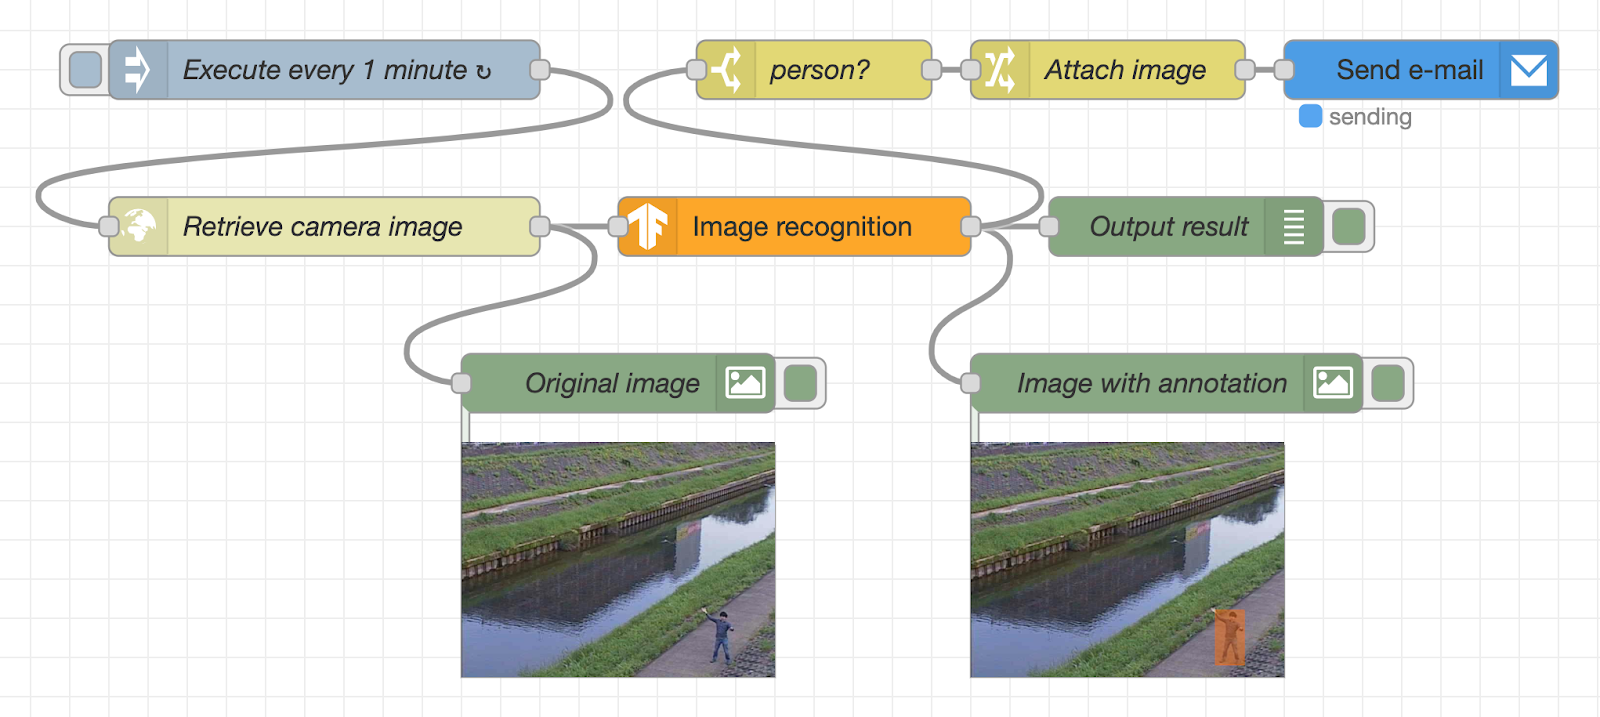
]]>In a previous article, we introduced a procedure for developing an image recognition flow using Node-RED and TensorFlow.js. Now, let’s apply those learnings from what we have done and develop an e-mail alert system that uses a surveillance camera together with image recognition. As shown in the following image, we will create a flow that automatically sends an email alert when a suspicious person is captured within a surveillance camera frame.

Objective: Develop flow
In this flow, the image of the surveillance camera is periodically acquired from the webserver, and the image is displayed under the “Original image” node in the lower left. After that, the image is recognized using the TensorFlow.js node. The recognition result and the image with recognition results are displayed under the debug tab and the “image with annotation” node, respectively.

If a person is detected by image recognition, an alert mail with the image file attached will be sent using the SendGrid node. Since it is difficult to set up a real surveillance camera, we will use a sample image sent by a surveillance camera in Kanagawa Prefecture of Japan to check the amount of water in the river.
We will explain the procedure for creating this flow in the following sections. For the Node-RED environment, use your local PC, a Raspberry Pi, or a cloud-based deployment.
Install the required nodes
Click the hamburger menu on the top right of the Node-RED flow editor, go to “Manage palette” -> “Palette” tab -> “Install” tab, and install the following nodes.
- –node-red-contrib-tensorflow: Image recognition node using TensorFlow.js
- –node-red-contrib-image-output: Nodes that display images on the Flow Editor
- –node-red-contrib-sendgrid: Nodes that send mail using SendGrid
Create a flow of acquiring image data
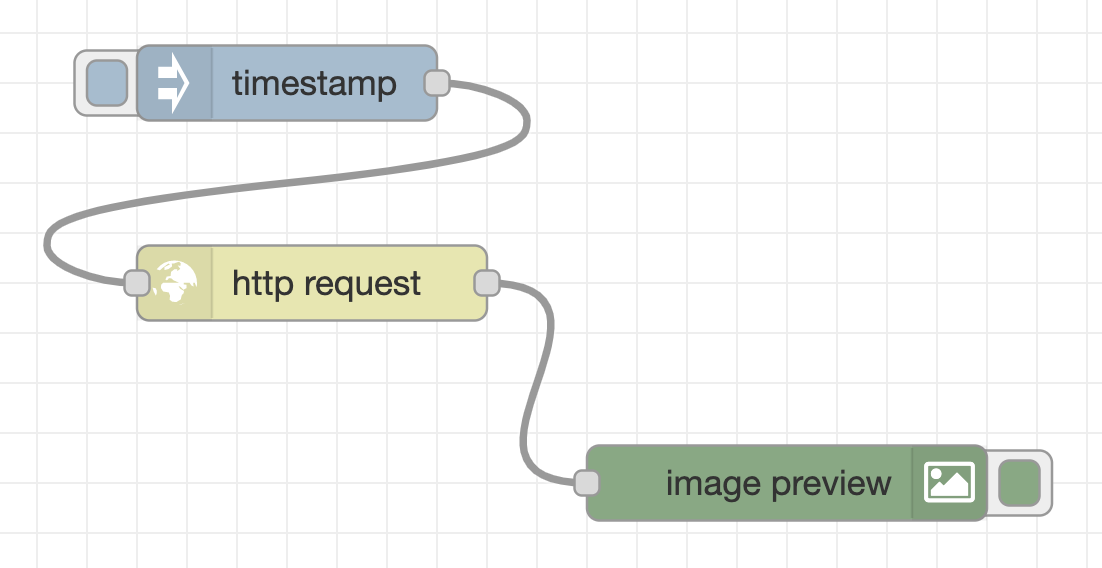
First, create a flow that acquires the image binary data from the webserver. As in the flow below, place an inject node (the name will be changed to “timestamp” when placed in the workspace), http request node, and image preview node, and connect them with wires in the user interface.
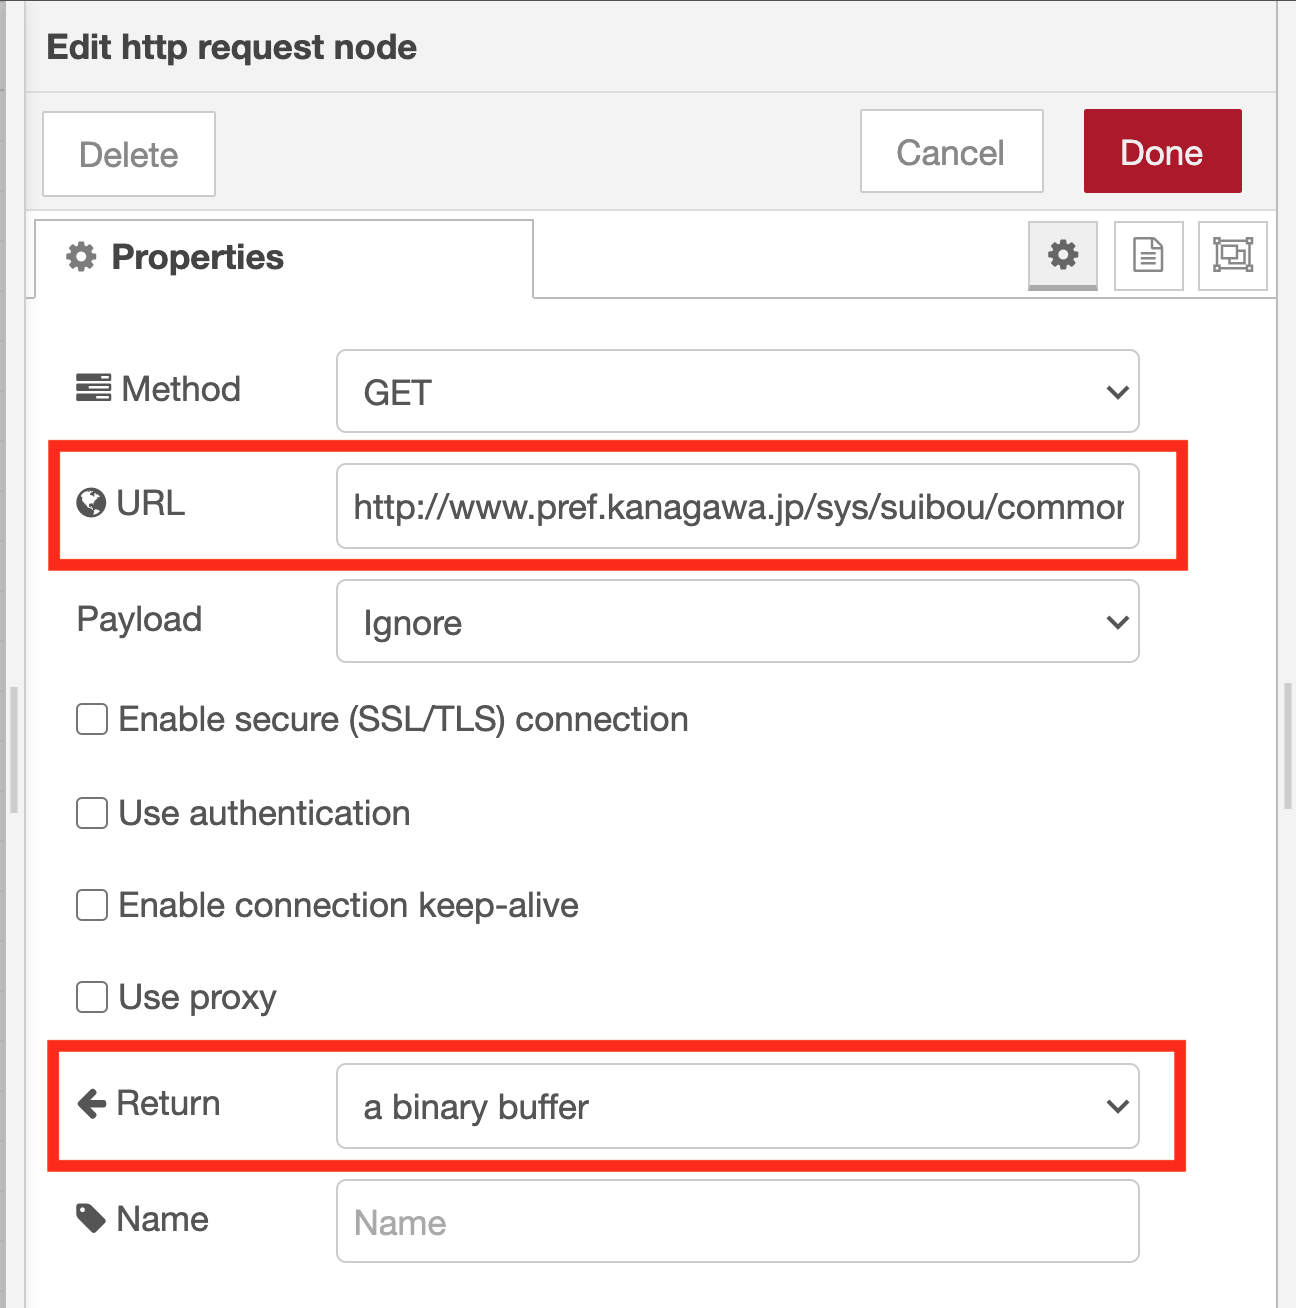
Then double-click the http request node to change the node property settings.
Adjust http request node property settings
Paste the URL of the surveillance camera image to the URL on the property setting screen of the http request node. (In Google Chrome, when you right-click on the image and select “Copy image address” from the menu, the URL of the image is copied to the clipboard.) Also, select “a binary buffer” as the output format.
Execute the flow to acquire image data
Click the Deploy button at the top right of the flow editor, then click the button to the inject node’s left. Then, the message is sent from the inject node to the http request node through the wire, and the image is acquired from the web server that provides the image of the surveillance camera. After receiving the image data, a message containing the data in binary format is sent to the image preview node, and the image is displayed under the image preview node.
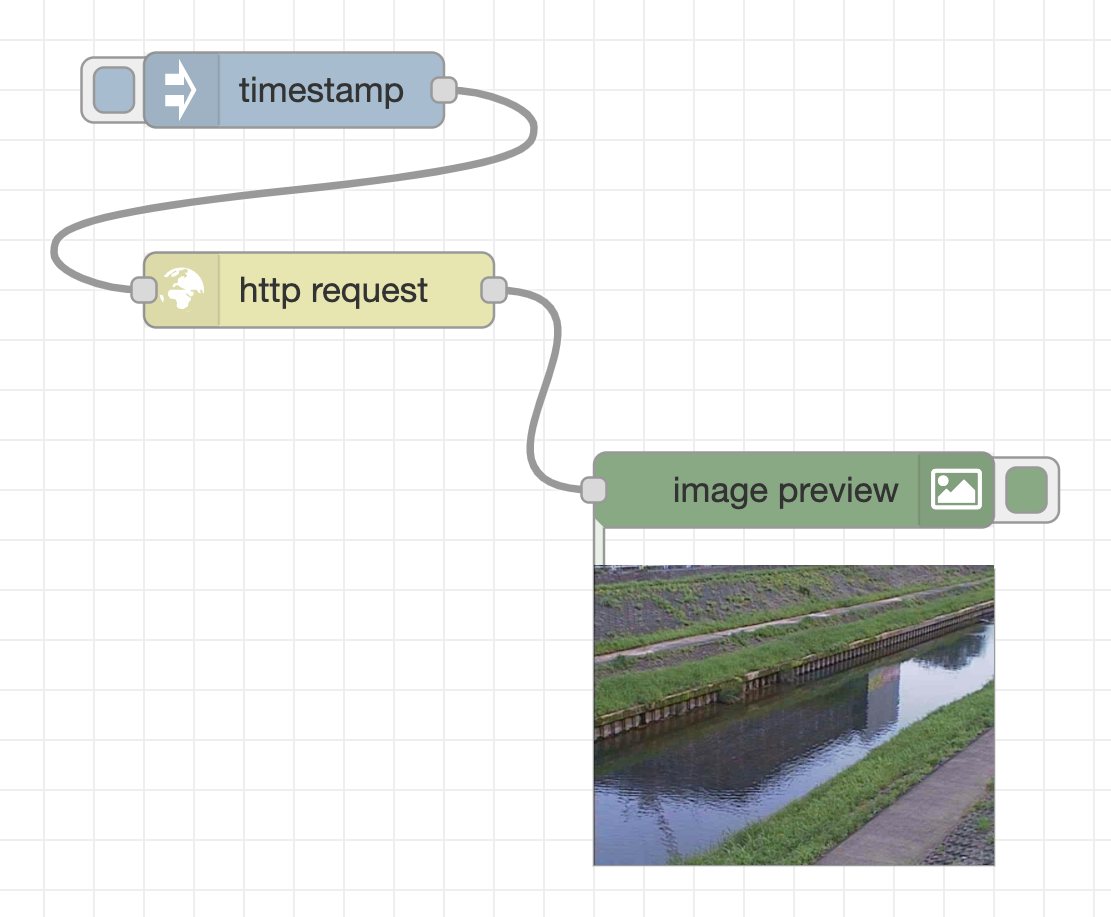
An image of the river taken by the surveillance camera is displayed in the lower right.
Create a flow for image recognition of the acquired image data
Next, create a flow that analyzes what is in the acquired image. Place a cocossd node, a debug node (the name will be changed to msg.payload when you place it), and a second image preview node.
Then, connect the output terminal on the right side of the http request node, and the input terminal on the left side of the cocossd node.
Next, connect the output terminal on the right side of the cocossd node and the debug node, the output terminal on the right side of the cocossd node, and the input terminal on the left side of the image preview node with the respective wires.
Through the wire, the binary data of the surveillance camera image is sent to the cocossd node, and after the image recognition is performed using TensorFlow.js, the object name is displayed in the debug node, and the image with the image recognition result is displayed in the image preview node.
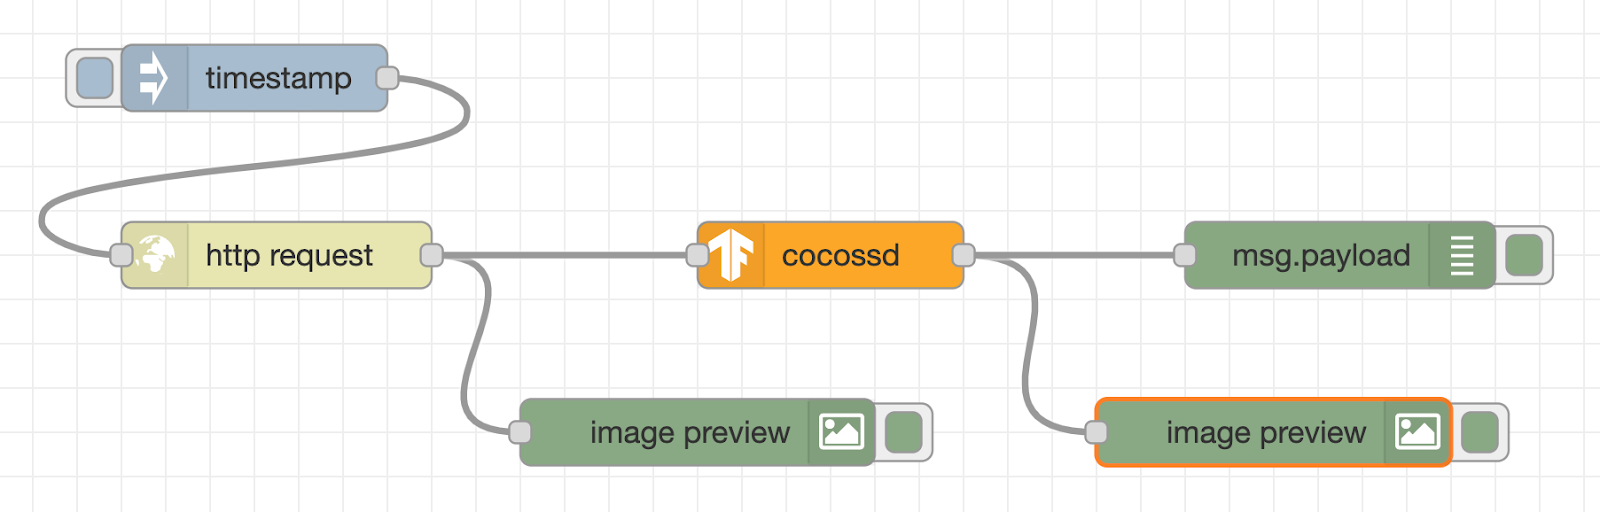
The cocossd node is designed to store the object name in the variable msg.payload, and the binary data of the image with the annotation in the variable msg.annotatedInput.
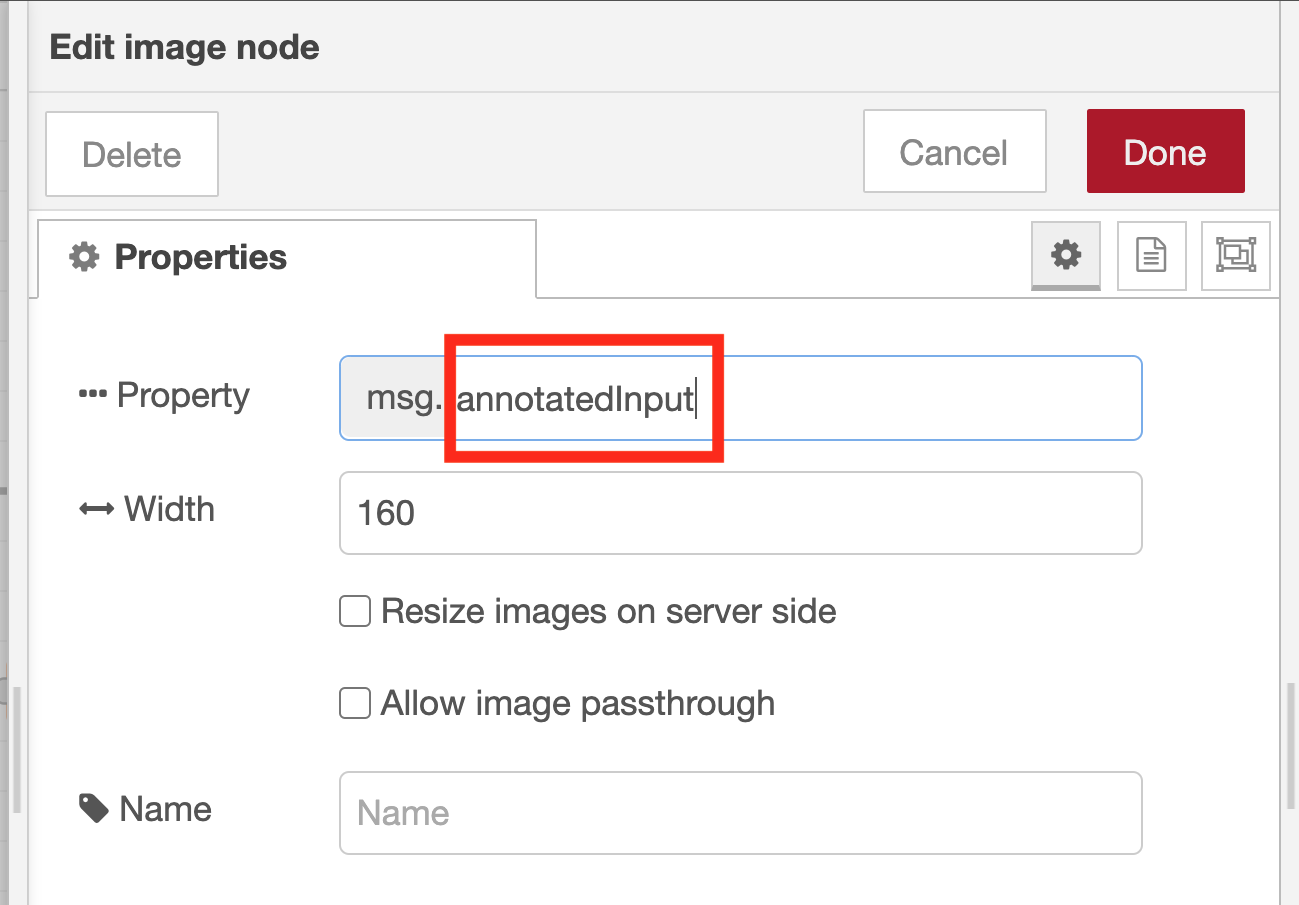
To make this flow work as intended, you need to double-click the image preview node used to display the image and change the node property settings.
Adjust image preview node property settings
By default, the image preview node displays the image data stored in the variable msg.payload. Here, change this default variable to msg.annotatedInput.
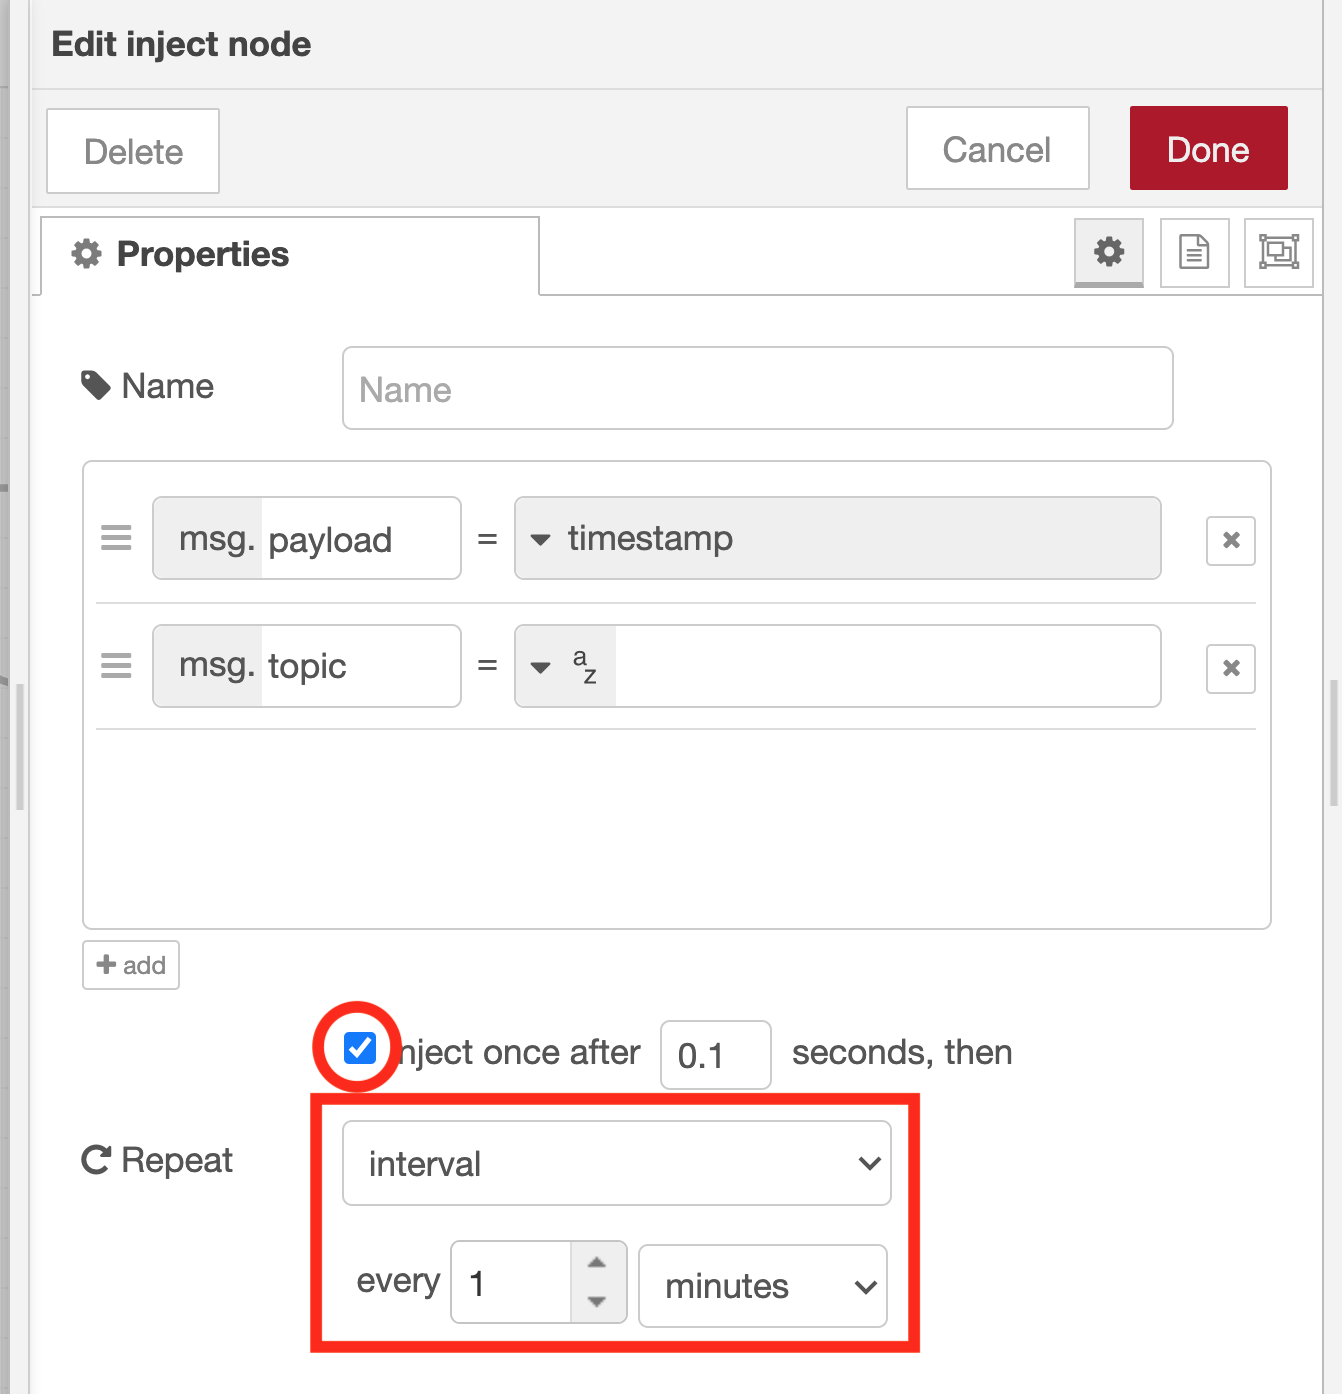
Adjust inject node property settings
Since the flow is run regularly every minute, the inject node’s property needs to be changed. In the Repeat pull-down menu, select “interval” and set “1 minute” as the time interval. Also, since we want to start the periodic run process immediately after pressing the Deploy button, select the checkbox on the left side of “inject once after 0.1 seconds”.
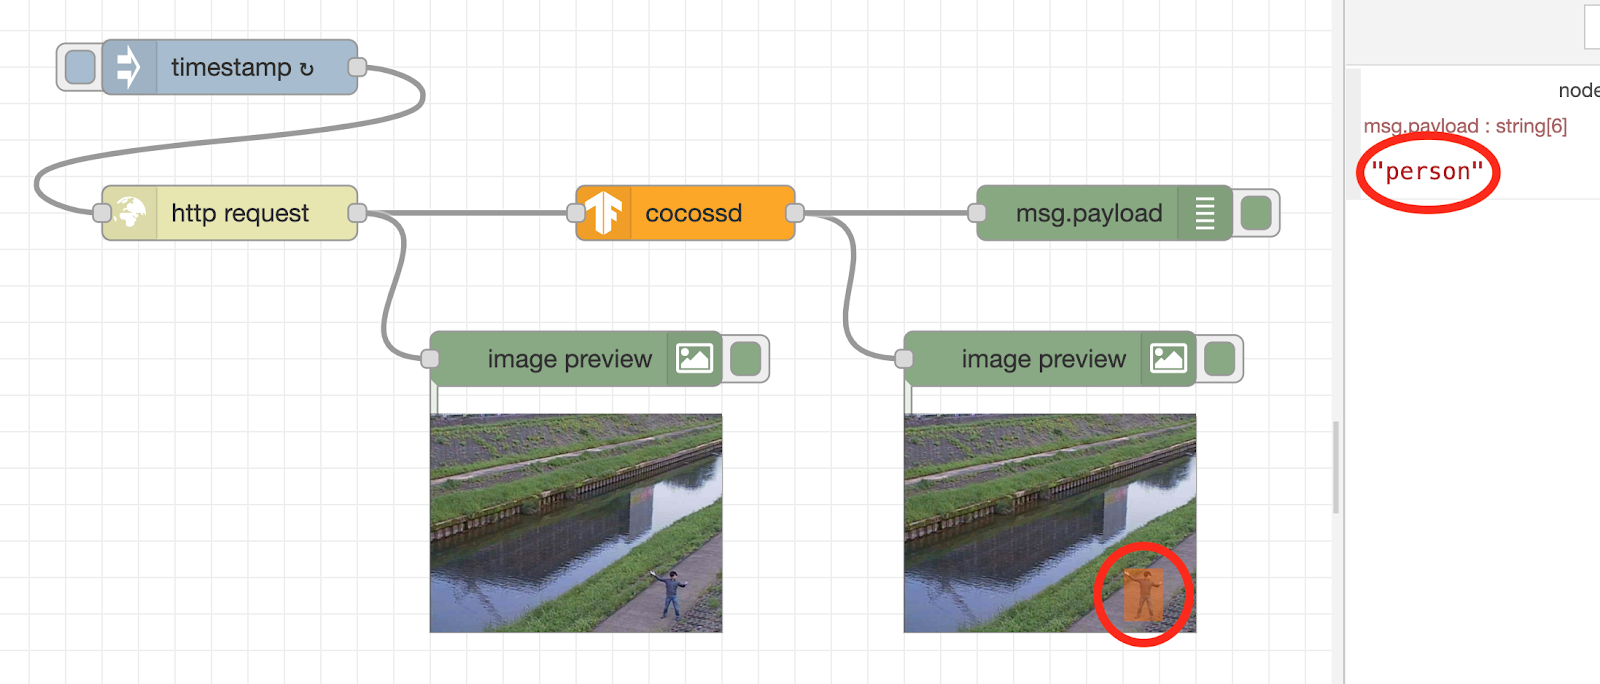
Run the flow for image recognition
The flow process will be run immediately after pressing the Deploy button. When the person (author) is shown on the surveillance camera, the image recognition result “person” is displayed in the debug tab on the right. Also, below the image preview node, you will see the image annotated with an orange square.
Create a flow of sending an email when a person caught in the surveillance camera
Finally, create a flow to send the annotated image by email when the object name in the image recognition result is “person”. As a subsequent node of the cocossd node, place a switch node that performs condition determination, a change node that assigns values, and a sendgrid node that sends an email, and connect each node with a wire.
Then, change the property settings for each node, as detailed in the sections below.
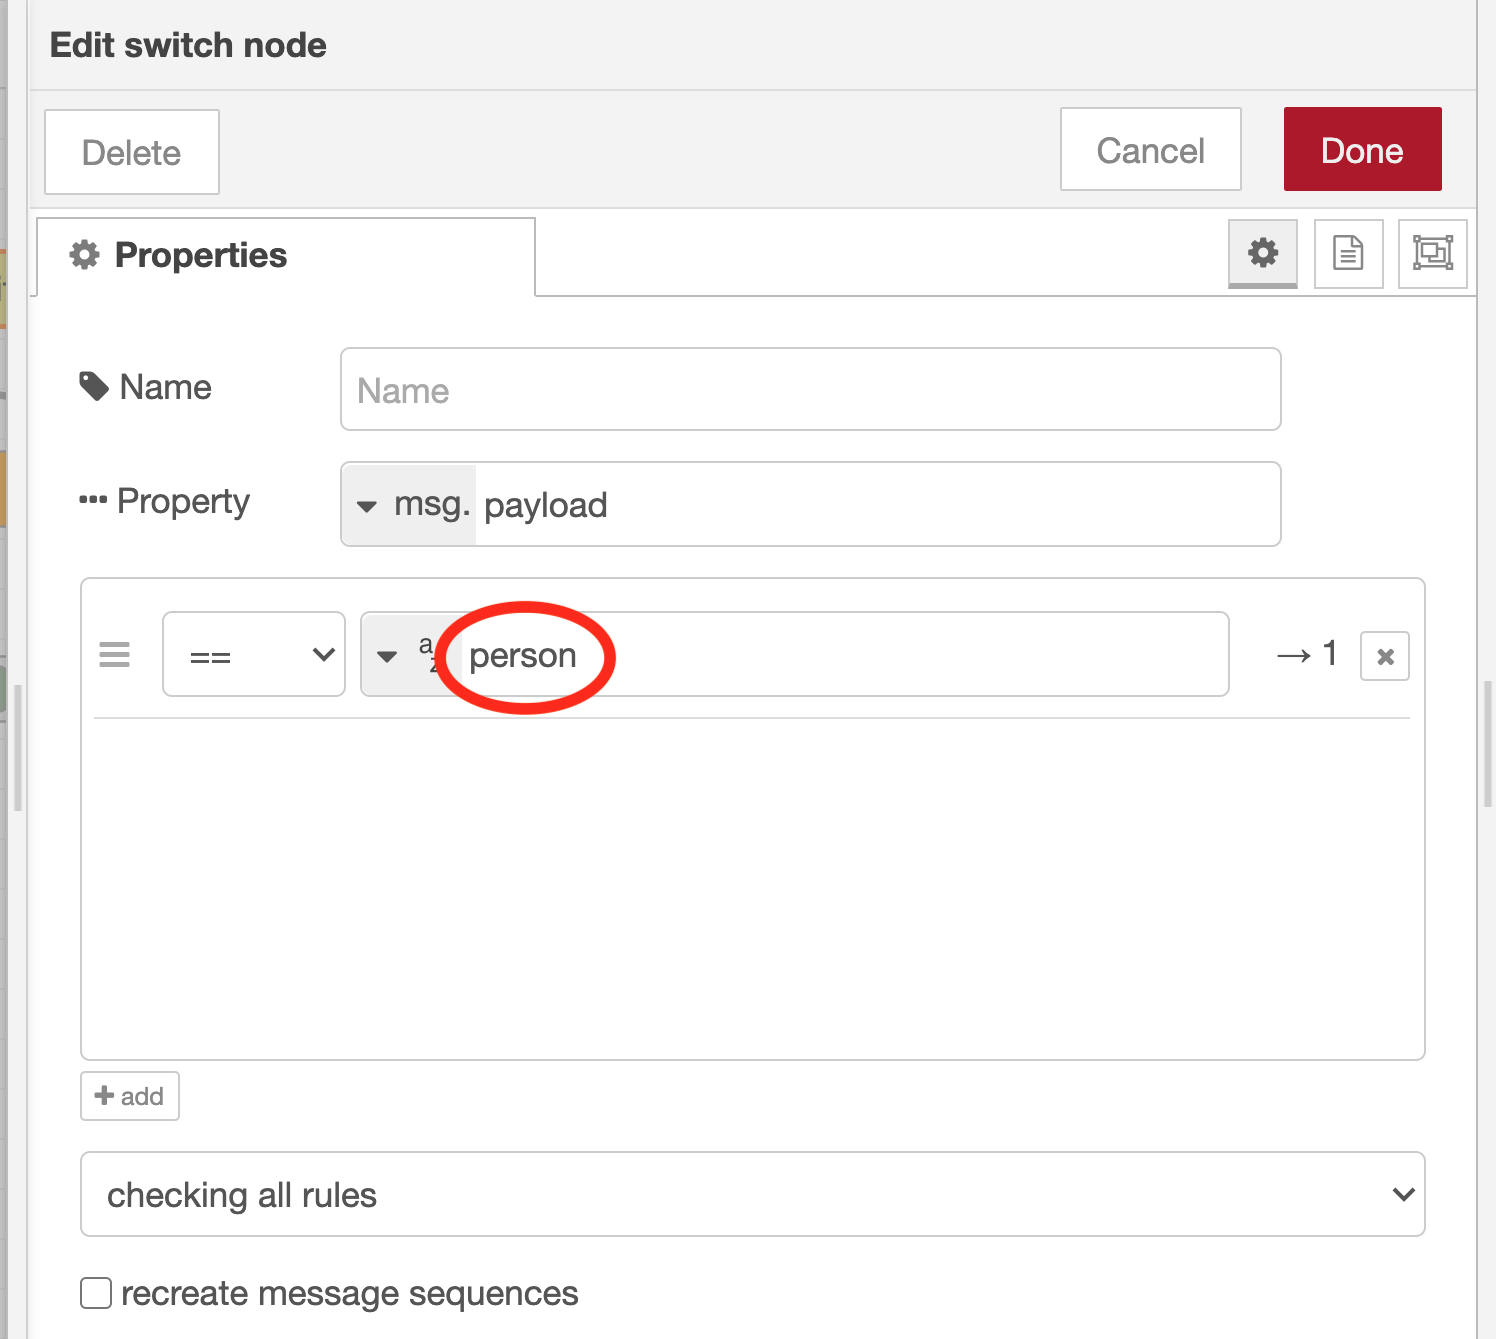
Adjust the switch node property settings
Set the rule to execute the subsequent flow only if msg.payload contains the string “person”
To set that rule, enter “person” in the comparison string for the condition “==” (on the right side of the “az” UX element in the property settings dialog for the switch node).
Adjust the change node property settings
To attach the image with annotation to the email, substitute the image data stored in the variable msg.annotatedInput to the variable msg.payload. First, open the pull-down menu of “az” on the right side of the UX element of “Target value” and select “msg.”. Then enter “annotatedInput” in the text area on the right.
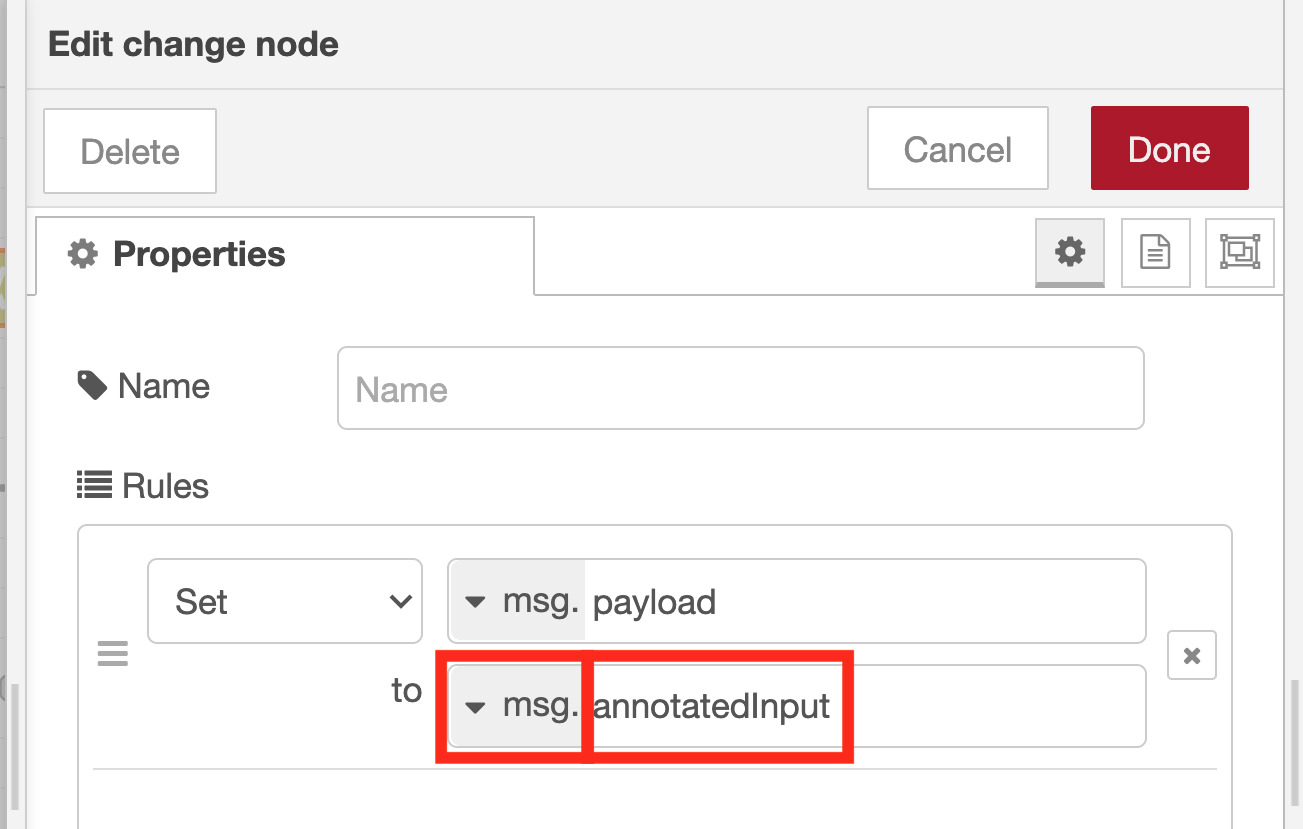
If you forget to change to “msg.” in the pull-down menu that appears when you click “az”, the flow often does not work well, so check again to be sure that it is set to “msg.”.
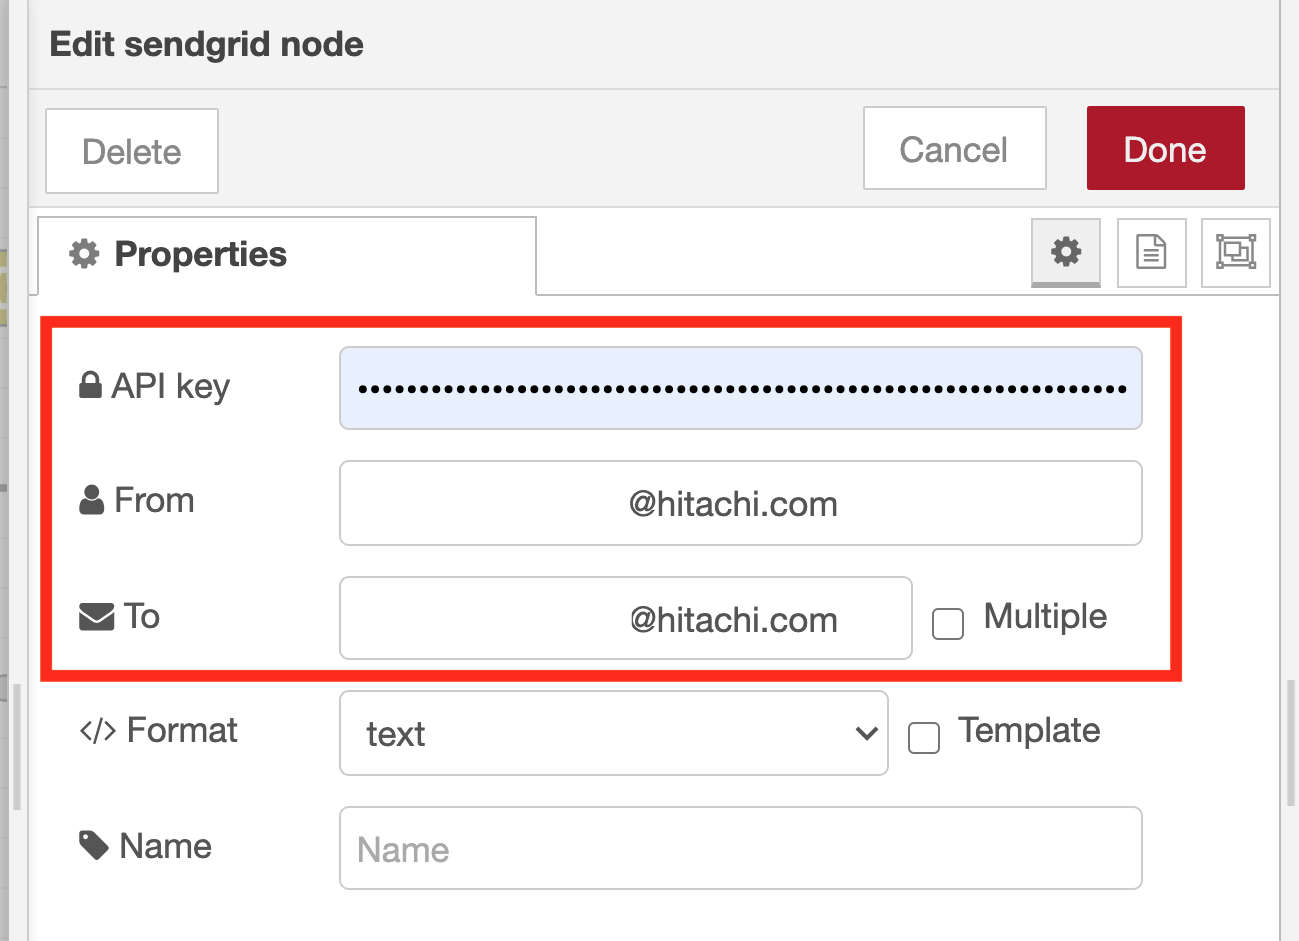
Adjust the sendgrid node property settings
Set the API key from the SendGrid management screen. And then input the sender email address and recipient email address.
Finally, to make it easier to see what each node is doing, open each node’s node properties, and set the appropriate name.
Validate the operation of the flow to send an email when the surveillance camera captures a person in frame
When a person is captured in the image of the surveillance camera, the image recognition result is displayed in the debug tab the same as in the previous flow of confirmation and the orange frame is displayed in the image under the image preview node of “Image with annotation”. You can see that the person is recognized correctly.
After that, if the judgment process, the substitution process, and the email transmission process works as designed, you will receive an email with the image file with the annotation attached to your smartphone as follows:

Conclusion
By using the flow created in this article, you can also build a simple security system for your own garden using a camera connected to a Raspberry Pi. At a larger scale, image recognition can also be run on image data acquired using network cameras that support protocols such as ONVIF.
About the author: Kazuhito Yokoi is an Engineer at Hitachi’s OSS Solution Center, located in Yokohama, Japan.
The post Developing an email alert system using a surveillance camera with Node-RED and TensorFlow.js appeared first on Linux.com.
]]>The post openSUSE Leap 15.2 Hits RC Phase With GNOME 3.34 + KDE Plasma 5.18, Sway appeared first on Linux.com.
]]>Read More at Phoronix
The post openSUSE Leap 15.2 Hits RC Phase With GNOME 3.34 + KDE Plasma 5.18, Sway appeared first on Linux.com.
]]>The post Google Open-Sources AI for Using Tabular Data to Answer Natural Language Questions appeared first on Linux.com.
]]>Read More at InfoQ.com
The post Google Open-Sources AI for Using Tabular Data to Answer Natural Language Questions appeared first on Linux.com.
]]>The post CrowdStrike Falcon bolsters Linux protection with ML prevention, custom and dynamic IoAs appeared first on Linux.com.
]]>Read More at Help Net Security
The post CrowdStrike Falcon bolsters Linux protection with ML prevention, custom and dynamic IoAs appeared first on Linux.com.
]]>The post NVIDIA EGX A100 Is Powered By Ampere Architecture appeared first on Linux.com.
]]>Read More at TFiR
The post NVIDIA EGX A100 Is Powered By Ampere Architecture appeared first on Linux.com.
]]>