Ubuntu is one of the most user-friendly Linux distributions available. This ease of use trickles down from the installation all the way through to the new user experience. It was created to bring Linux into a world where everyone could enjoy a PC experience free of frustration.
One of the areas that often frustrates people is wireless network configuration. From the new users perspective this should be something that “just works.” In some Linux distributions, the configuration of a wireless network connection can be an experience that can lead to voices raised and broken keyboards. It doesn’t have to be that way.
Thankfully, Ubuntu agrees.
Wireless Configuration Tools in Ubuntu Linux
The issue of connecting to a wireless access point. For some this task is simple. For some, however, this task is an exhausting exercise in futility. There are two reasons wireless can be a hassle: (1) Unsupported wireless device, or (2) Using the wrong tool to make a connection. If your problem is the former you’re in luck with Ubuntu becasue this distribution allows you to download and install proprietary drivers that can make your hardware work. If your problem is the latter you are also in luck, because Ubuntu comes with one of the best tools for configuring wireless networking available.
Adding Proprietary Drivers in Ubuntu
There are instances where your wireless card might not work with the standard, open drivers. If you are using Ubuntu this isn’t a problem. You can install third-party, proprietary drivers to overcome a lack of support from open source drivers for your hardware.
NOTE: In most cases this is not the fault of the Linux development community but more the fault of the hardware driver not releasing the specs for their devices.
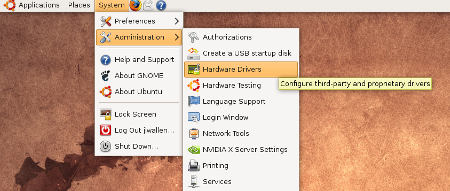
To add Proprietary drivers for your wireless card take a look at the System menu (we’re using the default Ubuntu installation with GNOME as the desktop). In that menu you will find the Hardware Drivers submenu within the Administration menu (see Figure 1). Before you continue on with this step, it should be noted that you will have to have an established network connection to complete these steps because the proprietary driver must be downloaded from the net. For this you can just use a standard wired ethernet connection. Once you have completed the installation of the proprietary drivers you can uplug the wired connection and get to work with your wireless setup.
When the new window opens (see Figure 2) you will see a listing of all possible hardware on your machine that can take advantage of proprietary drivers. What you will have to do is scroll through the contents of the window until you find your wireless card listed. Once you have found it, select it, and click the Activate button. You will be prompted for your user password in order for the installation to continue. Enter the password and watch the installation work.
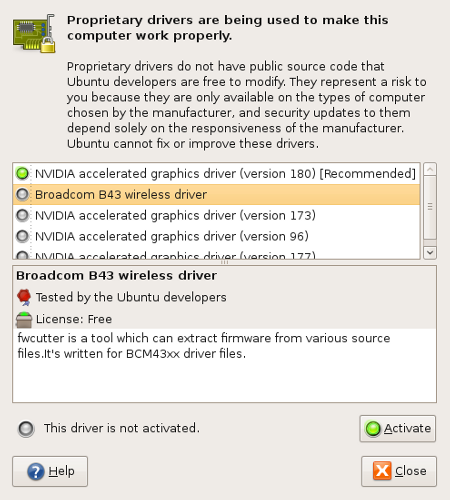
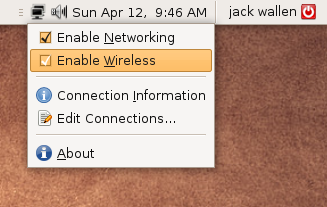
Once that is finished you can close the Proprietary driver window. Now when you go back to the NetworkManager Applet in the panel you will see what Wireless is enabled (see Figure 3).
Configuring Wireless Networking
Now we need to go back and actually configure a wireless interface. To do this go back and left click the NetworkManager Applet to bring up a menu that includes the “Create new wireless network” entry. Select that entry to bring up a small window where you will enter the name of the wireless network and select the type of security the network uses. If the network uses a secure setup the window will change to include a Password line where you will enter the wireless network password (see Figure 4).
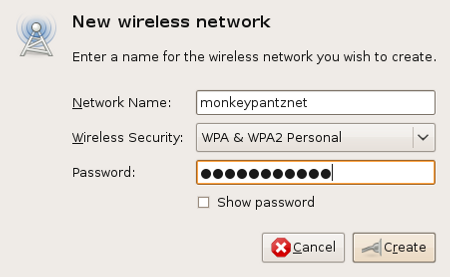
Once you have clicked the Create button you will notice the NetworkManager applet change to indicate it is attempting to connect (see Figure 5). Once the connection is established you will get a notice the connection was made and the NetworkManager applet will show the all-to-familar “four bar wireless icon” (see Figure 6). You are ready for wireless networking.


If you left click the NetworkManager applet now you will see your wireless network listed as connected as well as the signal strength you are receiving (see Figure 7).

Editing Your Wireless Connection
If you want to go back and edit some of the settings on your wireless network it’s very simple. Go back to the NetworkManager applet and right click the icon. Select the Edit Connections entry to bring up the Edit Connections window. In this window you will see five tabs. Click on the Wireless tab to reveal a list of the wireless connections you have established (see Figure 8).
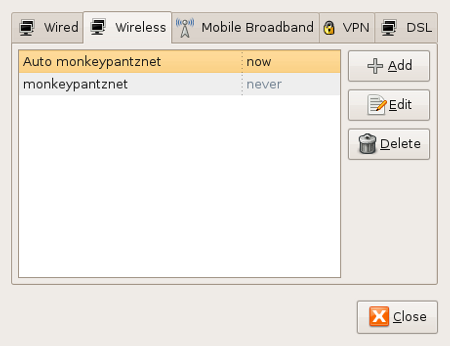
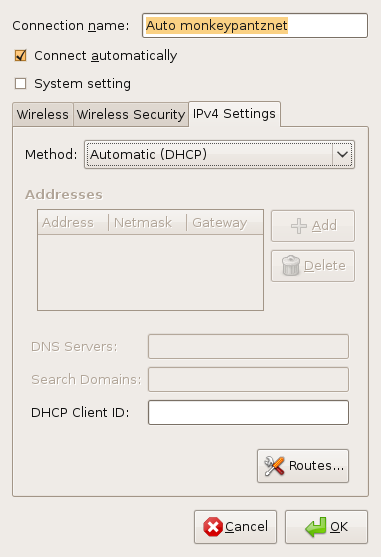
Say you want to switch one particular wireless network from DHCP to Static IP. To do this select the wireless connection and click Edit which will bring up a new window. In this new window there are three tabs. Click on the IPv4 Settings tab (see Figure 9), select Manual from the Method drop down, and fill out the necessary information. Click OK to save this information.
Final Thoughts
You see, setting up a wireless connection in Ubuntu isn’t difficult at all. Even if you have a card that some other distributions can not detect, Ubuntu can most likely help you out. Ubuntu is one of the most user friendly distributions and configuring a wireless network proves it.


